- HR:+91-879-9184-787
- Sales:+91-908-163-7774

Creating mobile applications can be an exciting journey. However, selecting the right tools can make all the difference. According to a survey by Stack Overflow, 61.1% of developers prefer using frameworks like React Native for mobile app development, primarily because they can efficiently create cross-platform apps.
Tailwind CSS is a popular styling framework in web development known for its utility-first approach. But can you use React Native Tailwind? The answer is yes!
In this post, we will explore how to use Tailwind CSS with React Native effectively. We will cover the setup process, key concepts, and how to apply Tailwind styles to your React Native components.
Tailwind CSS is a utility-first CSS framework designed to simplify and accelerate the process of building custom user interfaces. Unlike traditional CSS frameworks that offer predefined components, Tailwind focuses on single-purpose utility classes, allowing developers to apply styles directly in their HTML or JSX markup. This approach eliminates the need for extensive CSS files, enabling rapid development and immediate visual feedback.
One of Tailwind CSS’s key benefits is its flexibility and responsiveness. Developers can create complex layouts by combining multiple utility classes, leading to a more modular and maintainable codebase.
Tailwind’s configuration file allows for easy customization of themes, colors, and spacing, ensuring visual consistency across a project. With its growing community and rich ecosystem of plugins, Tailwind CSS has become a popular choice among developers looking to build visually appealing and responsive applications quickly.
Now, let’s understand how we can get started with React Native Tailwind.
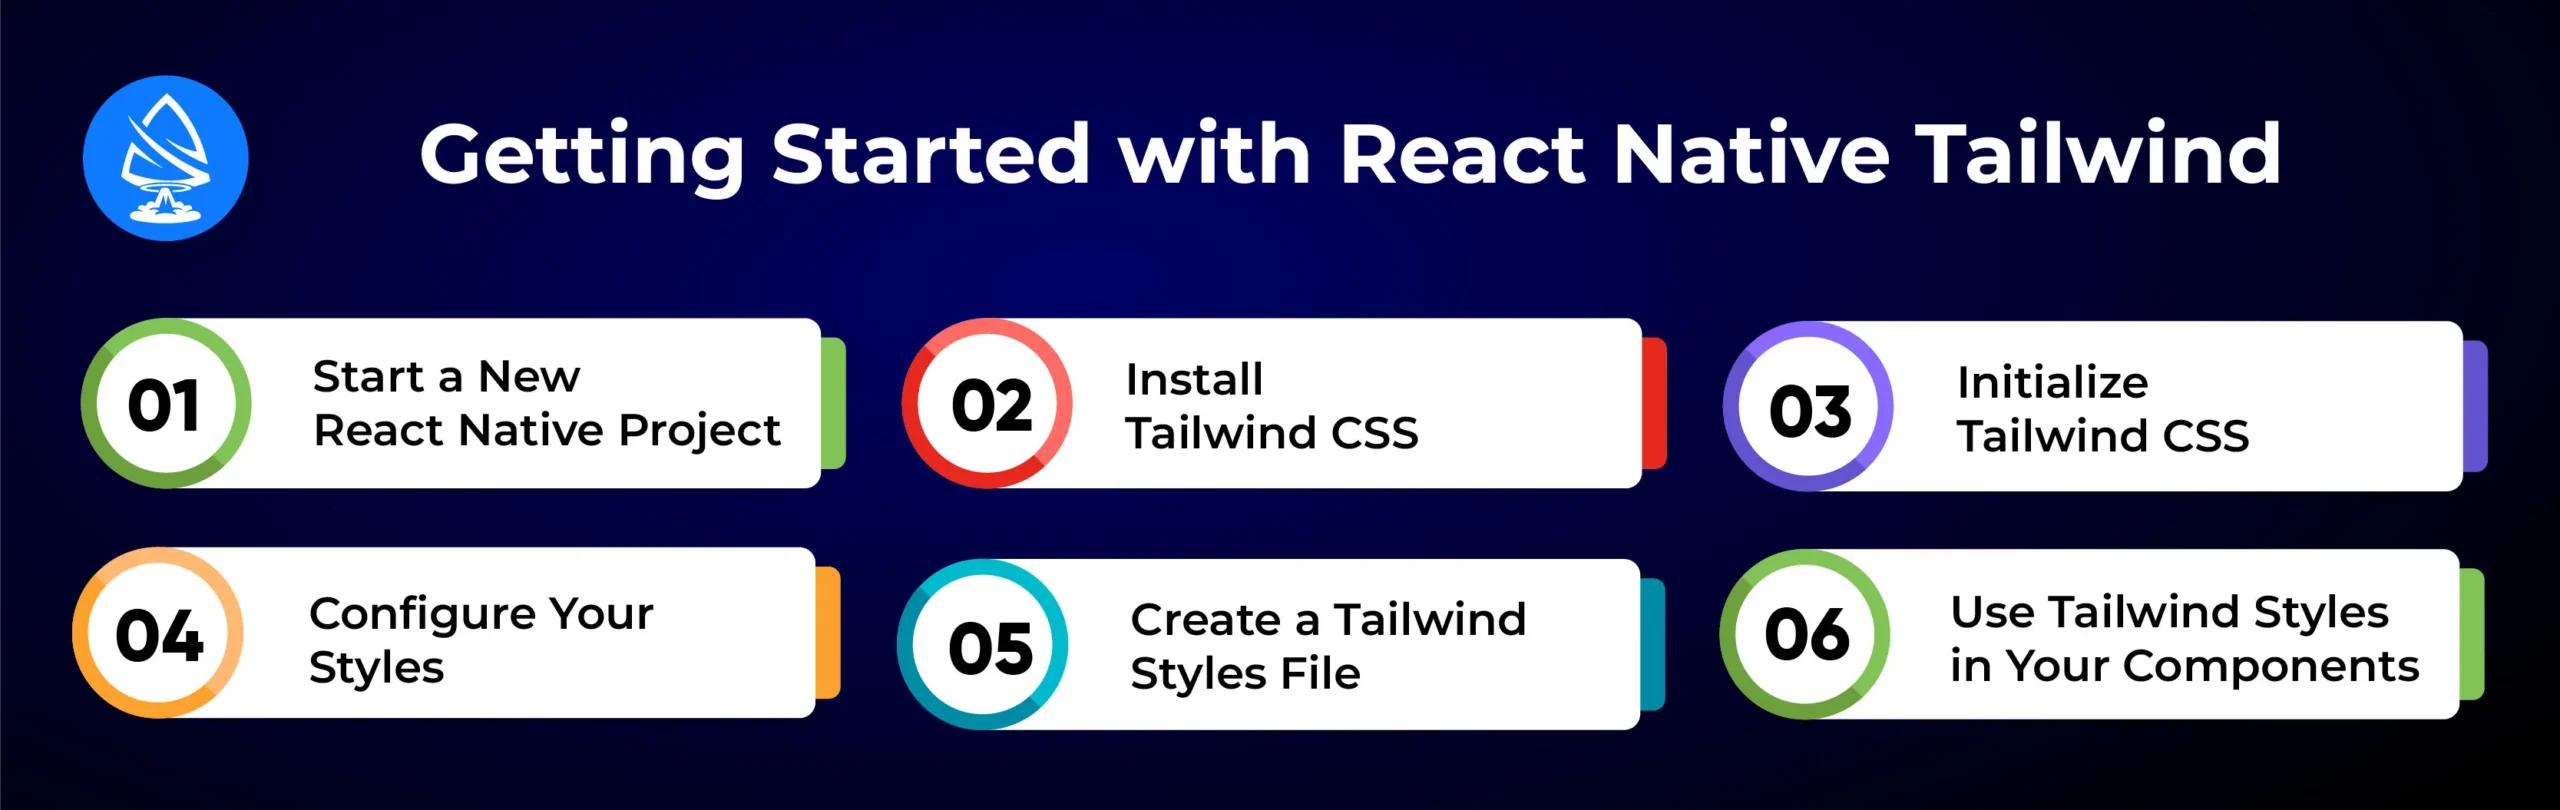
It’s essential to set up Tailwind CSS correctly to use it in your React Native CSS project effectively. This step-by-step guide will walk you through React Native get start, ensuring a smooth integration of Tailwind CSS into your mobile application development workflow.
The first step is to create a new React Native project using a command-line interface (CLI) tool designed explicitly for React Native development. If you haven’t installed the React Native CLI yet, you can do so using Node Package Manager (npm) or Yarn.
Once installed, you can create a new project that contains all the necessary files and folders for your React Native application.
With your new project created, the next step is to install Tailwind CSS. Since Tailwind CSS is primarily a web-focused framework, you need to use a package that enables its use in React Native.
You can find specific packages designed for integrating React Native Tailwind CSS, which you will need to install to proceed.
After successfully installing Tailwind CSS, the next step is to initialize it in your project. This process involves creating a configuration file that allows you to customize Tailwind’s default settings according to your design preferences.
This configuration file is crucial for defining the styles and ensuring they fit your specific project requirements.
Open the configuration file to begin customizing your styles. This is where you can define your design system, including customizing colors, fonts, and spacing.
By adjusting these parameters, you can customize Tailwind CSS React Native to match your application’s branding guidelines and visual identity.
To streamline the styling process, create a dedicated file for managing your Tailwind styles. This file will help you organize and apply Tailwind classes across your React Native components.
By centralizing your styles, you enhance maintainability and make it easier to manage styling throughout your application.
Now that everything is set up, you can start applying Tailwind CSS styles to your React Native components. To style your elements quickly, use the utility classes defined in your configuration file.
This approach allows you to create visually appealing and consistent components that align with your overall design system.
React Native is a robust framework that allows developers to build mobile applications using JavaScript and React. Its ability to create cross-platform apps that run on both iOS and Android makes it a popular choice among developers. When you combine Tailwind React Native, you can get many advantages that enhance the development experience and improve the quality of your applications.
One of the primary benefits of using React Native Tailwind is the speed of development. Tailwind’s utility classes allow developers to style components quickly and efficiently without the need for extensive CSS or custom styles.
This rapid styling process enables developers to focus more on functionality and user experience, resulting in faster project timelines and quicker iterations.
Tailwind CSS promotes consistency across your application by offering a set of predefined utility classes. These classes help maintain a uniform look and feel throughout your app, ensuring that design elements are cohesive.
This uniformity is particularly important in mobile applications, where a consistent user interface improves the user experience.
The use of utility classes in Tailwind CSS improves the readability of your code. When styles are applied directly in the markup, it’s easier to see what styles are associated with each component at a glance.
This clarity reduces developers’ cognitive load and simplifies understanding and maintaining the codebase, especially in larger projects with multiple contributors.
Tailwind CSS includes responsive utility classes, allowing developers to create designs that adapt seamlessly to different screen sizes. This capability is crucial for mobile applications, where users access content on various devices.
By using Tailwind’s responsive design features, you can ensure that your app looks great on all devices without writing custom media queries.
Tailwind CSS provides a centralized configuration file where developers can define custom themes, colors, and spacing. This flexibility allows you to tailor the design system to match your brand’s identity or specific project requirements.
You can easily modify the design without altering the core code, making it straightforward to implement design changes or updates.
The utility-first approach of Tailwind encourages a modular design methodology. Developers can build components using small, reusable utility classes, which promotes better organization and separation of concerns.
This modularity simplifies the process of updating styles or reusing components across different parts of the application.
Tailwind CSS has a growing community and a rich ecosystem of plugins, tools, and resources. This support network makes it easier to find solutions to common challenges and access additional functionalities.
The availability of resources can significantly enhance the development process and help developers stay current with best practices.
Learn More: Understand the difference between Flutter vs React Native in our latest guide.
One challenge that developers face is the use of large utility class names. Tailwind’s utility-first approach can lead to lengthy class names that may clutter the markup, making it harder to read and maintain.
Solution: To manage this, consider using a utility function or helper that can shorten your class names. This way, you can create reusable style components that encapsulate complex utility combinations. By doing this, you can maintain clarity in your code while still benefiting from Tailwind’s styling capabilities.
If you’re working on a project that already has a CSS or styling framework, integrating Tailwind CSS can create conflicts between existing styles and new utility classes. This may result in unexpected behavior or styling issues in your components.
Solution: To avoid conflicts, take a systematic approach to migration. Start by identifying which components will use Tailwind and gradually transition styles to utility classes. You can also use Tailwind’s configuration options to create custom utility classes that align better with your existing styles, minimizing the risk of conflicts.
Another challenge involves performance, particularly when applying many utility classes to a single component. This can lead to increased render times, especially in larger applications.
Solution: To optimize performance, focus on using only the utility classes necessary for your components. Avoid excessive nesting and apply Tailwind classes strategically. You can also consider using memoization techniques in React Native to prevent unnecessary re-renders, which can help improve the overall performance of your application.
While Tailwind CSS provides utility classes for many common styling scenarios, it may have limited support for certain pseudo-classes and states in React Native. This can make it challenging to achieve specific interactive styles.
Solution: For scenarios not covered by Tailwind, you can create custom styles or use inline styles in React Native. By combining Tailwind’s utility classes with custom styles, you can achieve the desired interactivity while still maintaining the benefits of the utility-first approach.
For developers new to Tailwind CSS, understanding its utility-first approach and effectively using utility classes in React Native may involve a learning curve.
Solution: To ease this transition, take advantage of the extensive documentation and resources available for Tailwind CSS. Familiarize yourself with the utility classes and experiment with small components before scaling up to larger projects. Online tutorials and community forums can also provide valuable support as you learn to implement Tailwind CSS effectively.
Artoon Solutions specializes in React Native application development services and can guide you through the process of integrating React Native Tailwind. Our experienced team understands the unique challenges of mobile development and can help you create a seamless user experience.
Hire React Native app developers for tailored solutions that meet your specific needs, ensuring your app stands out in the competitive market.
Whether you’re starting a new project or looking to enhance an existing app, we provide comprehensive support at every stage of development. Our expertise in both React Native and Tailwind CSS means we can help you optimize your workflow and achieve your design goals efficiently.
Contact Artoon Solutions today to discuss how we can help you integrate Tailwind CSS with React Native and bring your vision to life.

Yes, you can use Tailwind CSS in React Native with packages like tailwindcss-react-native or nativewind. This integration allows you to leverage Tailwind’s utility-first approach for styling mobile components.
Yes, NativeWind is a great choice for integrating Tailwind CSS with React Native. It allows you to use utility classes for styling, simplifying the process of applying styles while maintaining the flexibility and power of Tailwind CSS.
No, React Native uses a styling system implemented in JavaScript, not traditional CSS. This approach is tailored for mobile development and optimizes performance across different devices.
Yes, Tailwind CSS works well with React. Its utility-first approach promotes quick and consistent styling, and its extensive community support and resources make it easier to implement in React projects.
Yes, Tailwind CSS is suitable for responsive design in React Native. It provides a set of responsive utility classes that enable developers to create layouts that adapt seamlessly to different screen sizes, ensuring a consistent user experience across various devices.
Artoon Solutions
Artoon Solutions is a technology company that specializes in providing a wide range of IT services, including web and mobile app development, game development, and web application development. They offer custom software solutions to clients across various industries and are known for their expertise in technologies such as React.js, Angular, Node.js, and others. The company focuses on delivering high-quality, innovative solutions tailored to meet the specific needs of their clients.