- HR:+91-879-9184-787
- Sales:+91-908-163-7774

Starting with React and unsure how to get your local application up and running? You’ve found the right guide. In today’s web development, React has become indispensable for creating dynamic and efficient front-end applications. In terms of mobile apps, react native mobile application development is leading the way.
Whether you’re a front-end developer looking to showcase your React skills or someone curious about launching a local React application, this comprehensive guide will solidify how you can run React app locally.
We’ll cover everything from the basics to getting your first React application running on your local machine. By the end, you’ll have a solid understanding and practical experience with React.
Let’s get started!
To run a React app locally, there are a few essential requirements you need to set up on your system. Ensuring that these prerequisites are installed and properly configured will help you get started smoothly. Let’s dive into the specific tools and software you need to begin running React applications on your local environment.
Before running a React app, it is important to have the following tools installed and configured on your computer. These prerequisites form the foundation for building and deploying React applications locally.
Node.js is a JavaScript runtime that allows you to run JavaScript code outside of a web browser. It is crucial for developing modern JavaScript applications, including React apps. When you install Node.js, npm (Node Package Manager) comes bundled with it. npm is used to manage the packages or libraries that your React application will depend on.
To install Node.js and npm:
| node -v npm -v |
These commands will display the installed versions of Node.js and npm, confirming the installation.
With Node.js and npm installed, you can proceed to install React. React apps can be quickly set up using the command-line tool `create-react-app`, which simplifies the process of building and managing React projects.
To install and create a new React app:
| npm install -g create-react-app |
| npx create-react-app my-react-app |
| cd my-react-app npm start |
Your React application will now start on `http://localhost:3000`, and you can begin developing your React project.
Before diving into React development, it’s important to have a well-configured environment. This ensures smooth coding, debugging, and management of your React projects. Setting up your environment involves choosing the right code editor, organizing your project, and ensuring all necessary tools are installed. Below, we explain how to set up Visual Studio Code (VS Code) as your code editor and how to prepare your project for development.
Visual Studio Code, commonly known as VS Code, is one of the most popular code editors for JavaScript development, including React projects. It is lightweight, versatile, and packed with features that help enhance productivity. Here’s how you can install and set it up:
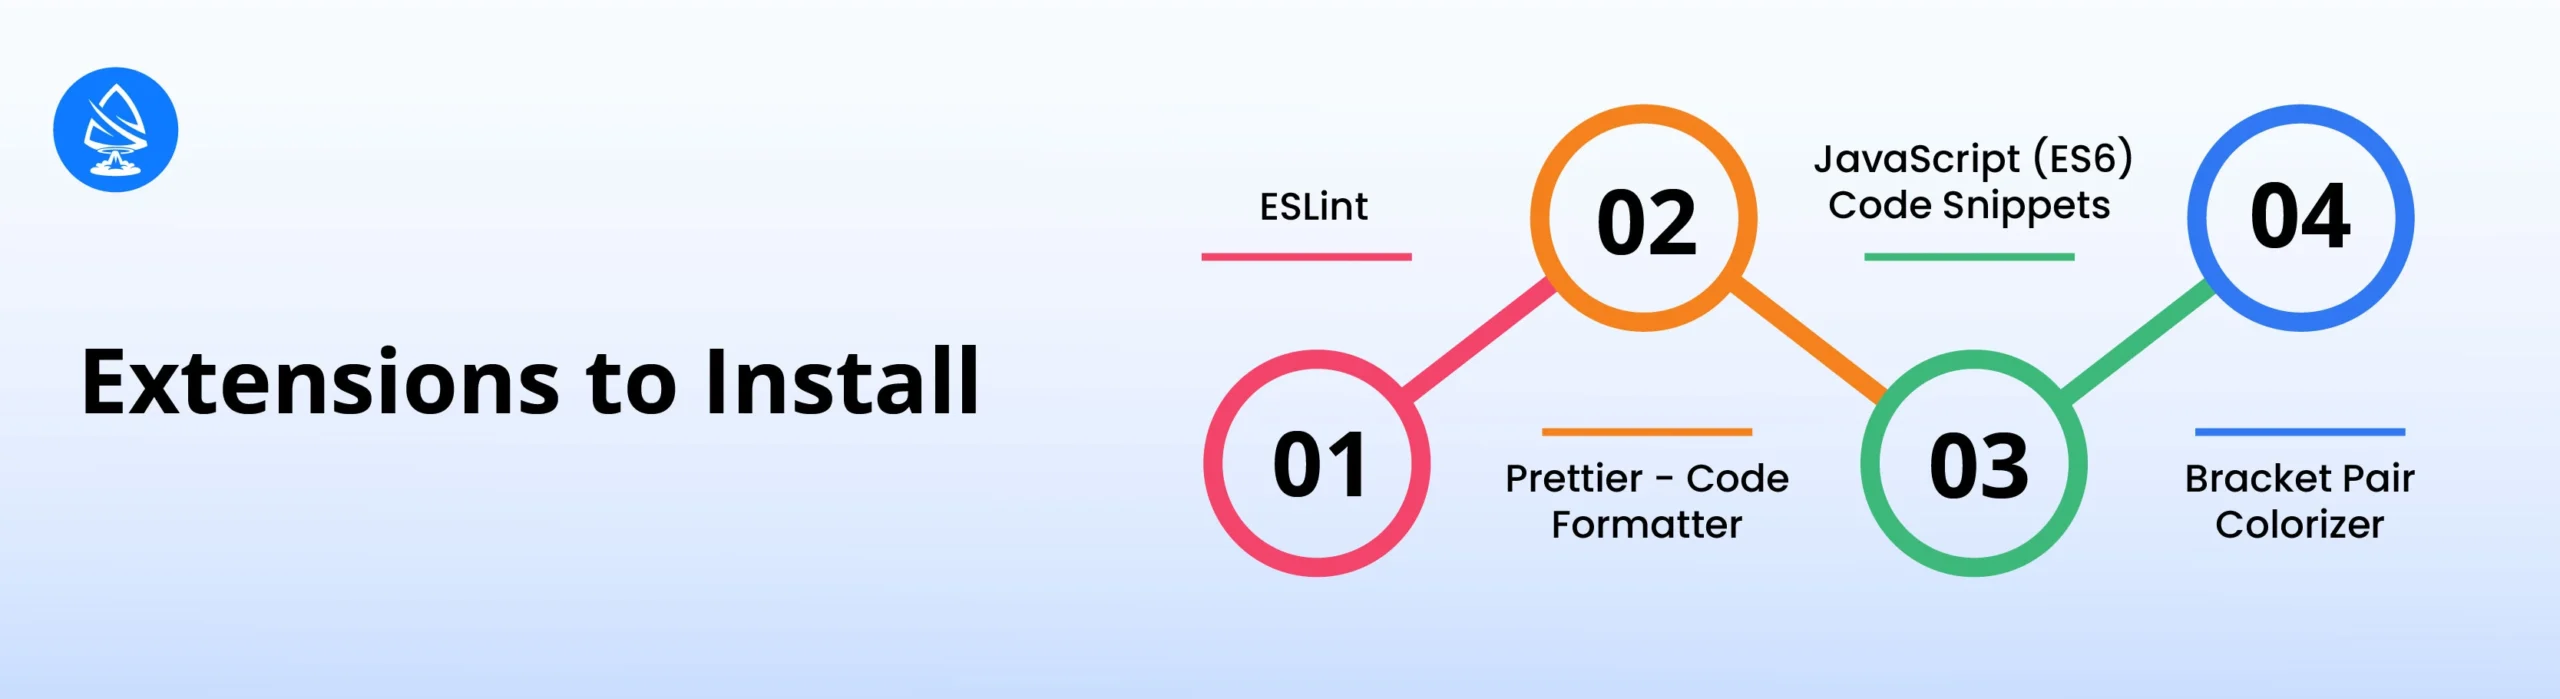
To streamline your React development, install some essential VS Code extensions. These include:
VS Code’s integrated terminal and Git support also make it easier to manage projects, track changes, and run your app without leaving the editor.
After installing your code editor, the next step is to set up your React project. This involves creating a structured directory, initializing the project, and configuring it for development.
| mkdir my-react-project cd my-react-project |
Use the `create-react-app` tool to set up your React environment and start react app. This will automatically configure the project structure, install dependencies, and provide scripts for running the app.
| npx create-react-app my-react-app |
The command above will create a new folder named `my-react-app` with all the necessary files and directories.
You can open your project directly from the terminal using:
| code my-react-app |
This will launch VS Code with your project folder loaded.
Navigate to the root of your project and start React app development server by running:
| npm start |
This will compile the React application and serve it locally. You can view your project in a web browser at `http://localhost:3000`.
After setting up your environment, you must be wondering how to run react app, but you also need to understand how to manage packages and dependencies. Here we will explore everything.
Managing packages and dependencies is a crucial part of working with React and JavaScript projects. Dependencies are the libraries or modules your project relies on to function properly. Effective management ensures that your project runs smoothly and remains up-to-date. Here’s how you can manage packages and dependencies in a React project.
Dependencies are external packages that your React app needs. For example, `react` and `react-dom` are essential dependencies for any React project. These packages help add functionality, handle complex tasks, and simplify your coding process. There are two types of dependencies:
To install packages in your React project, you use `npm` (Node Package Manager) or `yarn`. These package managers make it easy to add, remove, and update dependencies.
To install a package, follow the below command to run react app:
| npm install package-name |
By default, this command adds the package to the `dependencies` section. For example:
| npm install axios |
To add a package as a development dependency, use:
Example:
| npm install eslint –save-dev |
You can also manage packages with `yarn`, which some developers prefer for its speed.
| yarn add package-name |
For development dependencies to run react app command:
| yarn add package-name –dev |
The `package.json` file is at the heart of dependency management. It contains metadata about your project, including the list of dependencies, project scripts, version details, and more.
Here’s a breakdown of its key components:
Example of a basic `package.json` structure:
| { “name”: “my-react-app”, “version”: “1.0.0”, “dependencies”: { “react”: “^18.0.0”, “axios”: “^1.2.0” }, “devDependencies”: { “eslint”: “^8.0.0” }, “scripts”: { “start”: “react-scripts start”, “build”: “react-scripts build”, “test”: “react-scripts test”, “eject”: “react-scripts eject” } } |
Keeping dependencies up-to-date is vital for security and compatibility. You can update packages using:
To check outdated packages:
| npm outdated |
To update all packages:
| npm update |
For a specific package:
| npm install package-name@latest |
To check outdated packages:
| yarn outdated |
To update all packages:
| yarn upgrade |
For a specific package:
| yarn upgrade package-name |
Removing unused packages keeps your project lightweight and free of unnecessary dependencies.
To remove a package:
| npm uninstall package-name |
This will delete the package from the `node_modules` folder and remove it from `package.json`.
To remove a package:
| yarn remove package-name |
When you install dependencies, `npm` or `yarn` generates a lock file (`package-lock.json` for npm, `yarn.lock` for yarn). These files ensure that the same versions of dependencies are installed every time, which helps maintain consistency across different environments.
Make sure to commit the lock files to version control (e.g., Git) to avoid discrepancies when other developers set up the project or when deploying to production.
Once you’ve developed and tested your React application locally, the next step is to prepare it for deployment. Deployment involves packaging your app and making it accessible on a web server, allowing users to access it via the internet. This process ensures that your application is optimized for performance, security, and scalability.
Here’s a step-by-step guide on how to make your React app ready for deployment.
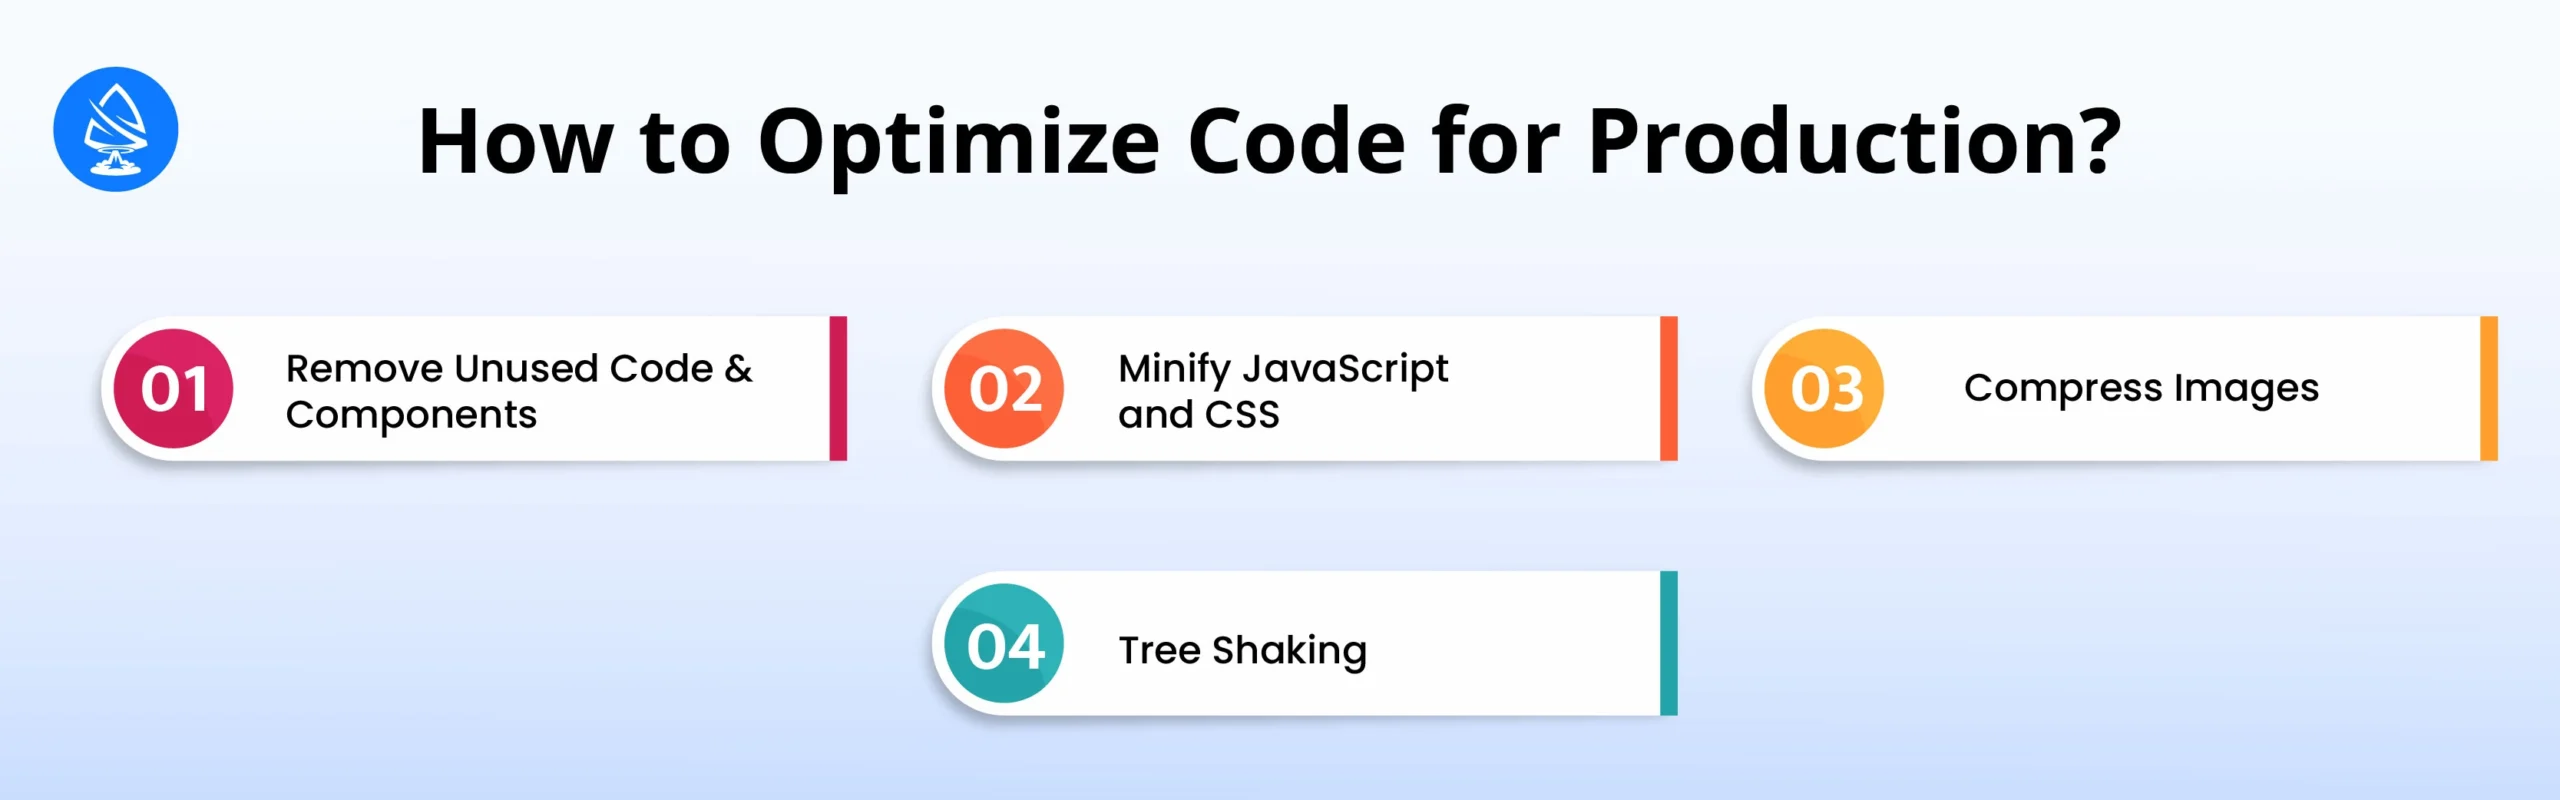
Before deploying, it’s essential to optimize your application. The development build of a React app includes helpful debugging features and tools, but these aren’t needed in production and can make your app larger and slower. To optimize your React app:
To deploy a React application, you need to create a production build. A production build bundles your code and optimizes it for better performance.
In your project directory, open the terminal and run:
| npm run build |
It will create a new folder called `build` in your project directory. The `build` folder contains the minified, optimized version of your React app, which is ready to be deployed.
The `build` folder includes:
This `build` folder is what you will upload to your web server.
Environment variables allow you to configure your app for different environments (development, testing, production) without hardcoding sensitive information. For example, you might want different API endpoints for development and production.
Add environment-specific variables in `.env` files:
| REACT_APP_API_URL=https://api.example.com |
In your React code, you can access this variable using:
| const apiUrl = process.env.REACT_APP_API_URL; |
Make sure to set the correct variables before running the `npm run build` command, as the build process will use these values to configure your application.
There are several platforms you can use to host your React application. Some popular choices include:
The process of deploying your React app depends on the hosting platform you choose. Here’s a general guide:
Install the GitHub Pages package:
| npm install gh-pages –save-dev |
Update your `package.json`:
| “homepage”: “https://yourusername.github.io/your-repository”, “scripts”: { “predeploy”: “npm run build”, “deploy”: “gh-pages -d build” } |
Run the command to deploy:
| npm run deploy |
Your React app will be available at `https://yourusername.github.io/your-repository`.
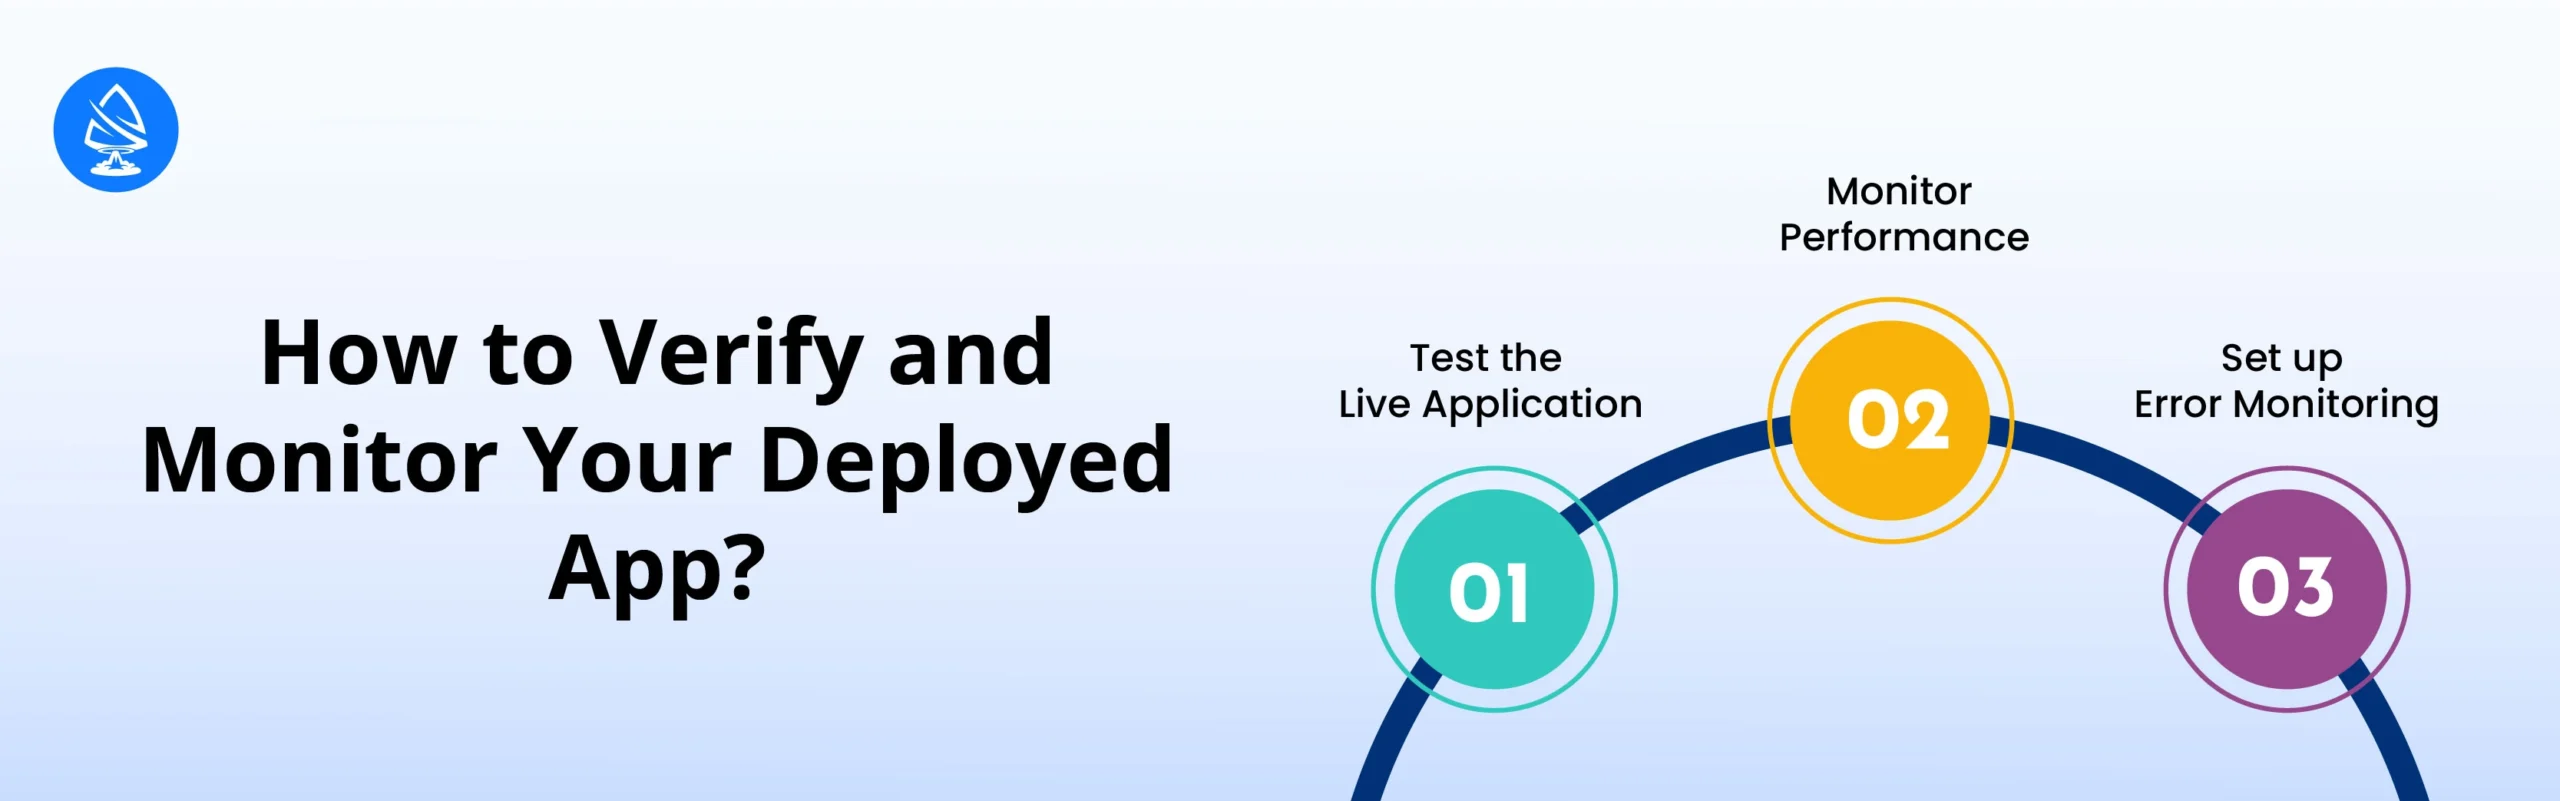
Once your app is deployed, it’s important to verify everything works as expected:

Running a React app locally is not just a skill; it’s the gateway to creating interactive web applications. Whether you’re a beginner or an experienced developer, understanding how to set up and run a React app will empower you to build amazing user interfaces.
So, would you choose React for your next project? Our team of qualified developers will make sure your project meets the quality standards and delivered on time.
Hire React Native App Developers from Artoon Solutions Now!
React is a JavaScript library for building user interfaces, primarily for web applications.
You can create a new React app using the command `npx create-react-app my-app`.
You need Node.js and npm, along with a code editor like VS Code.
Common troubleshooting steps include checking your project directory and ensuring all dependencies are installed.
Yes, with React Native, you can build mobile applications using React.
Artoon Solutions
Artoon Solutions is a technology company that specializes in providing a wide range of IT services, including web and mobile app development, game development, and web application development. They offer custom software solutions to clients across various industries and are known for their expertise in technologies such as React.js, Angular, Node.js, and others. The company focuses on delivering high-quality, innovative solutions tailored to meet the specific needs of their clients.
Copyright 2009-2025