- HR:+91-879-9184-787
- Sales:+91-908-163-7774

In the world of web development, understanding how HTTP POST requests NodeJS work is crucial, especially when working with NodeJS. Among the various types of HTTP requests, the HTTP POST request holds significant importance due to its ability to send data to the server for processing. In this article, we will dive deep into the concept of HTTP POST requests in NodeJS, explore how to make HTTP requests, and provide a comprehensive guide on handling POST requests effectively.
Before we delve into the specifics of HTTP POST requests in NodeJS, let’s first grasp the fundamental concept of HTTP requests. HTTP (Hypertext Transfer Protocol) is the foundation of data communication on the World Wide Web. It enables the transfer of various types of data between clients and servers.
Let’s understand how Nodejs HTTP requests work.
HTTP requests are categorized into different methods defined as GET, POST, PUT, DELETE, etc. Each method serves a specific purpose, with the POST method being commonly used for sending data to the server. When a client sends an HTTP POST request, it includes a payload that contains the data to be processed by the server.

The Node.js `http` module is a built-in module that provides functionality for creating HTTP servers and clients. It allows developers to handle HTTP requests and responses, enabling them to build web servers, make HTTP requests to external servers, and handle incoming requests from clients.
Developers use the `http` module in projects primarily for two purposes:
Developers can use the `http.createServer()` method to create a Node HTTP server. This server can listen to incoming HTTP requests and respond to them accordingly. Developers define callback functions to handle different types of requests (e.g., GET, POST) and generate appropriate responses.
Example:
| const http = require(‘http’); const server = http.createServer((req, res) => { res.writeHead(200, {‘Content-Type’: ‘text/plain’}); res.end(‘Hello, world!’); }); server.listen(3000, () => { console.log(‘Server running on port 3000’); }); |
Developers can use the `http.request()` method to make HTTP requests to external servers from within their Node.js applications. This allows applications to interact with other web servers, APIs, or services to fetch data, submit data, or perform other operations over HTTP.
Example:
| const http = require(‘http’); const options = { hostname: ‘www.example.com’, port: 80, path: ‘/api/data’, method: ‘GET’ }; const req = http.request(options, (res) => { let data = ”; res.on(‘data’, (chunk) => { data += chunk; }); res.on(‘end’, () => { console.log(data); }); }); req.on(‘error’, (error) => { console.error(error); }); req.end(); |
Read More: What are Microservices in Node.js?
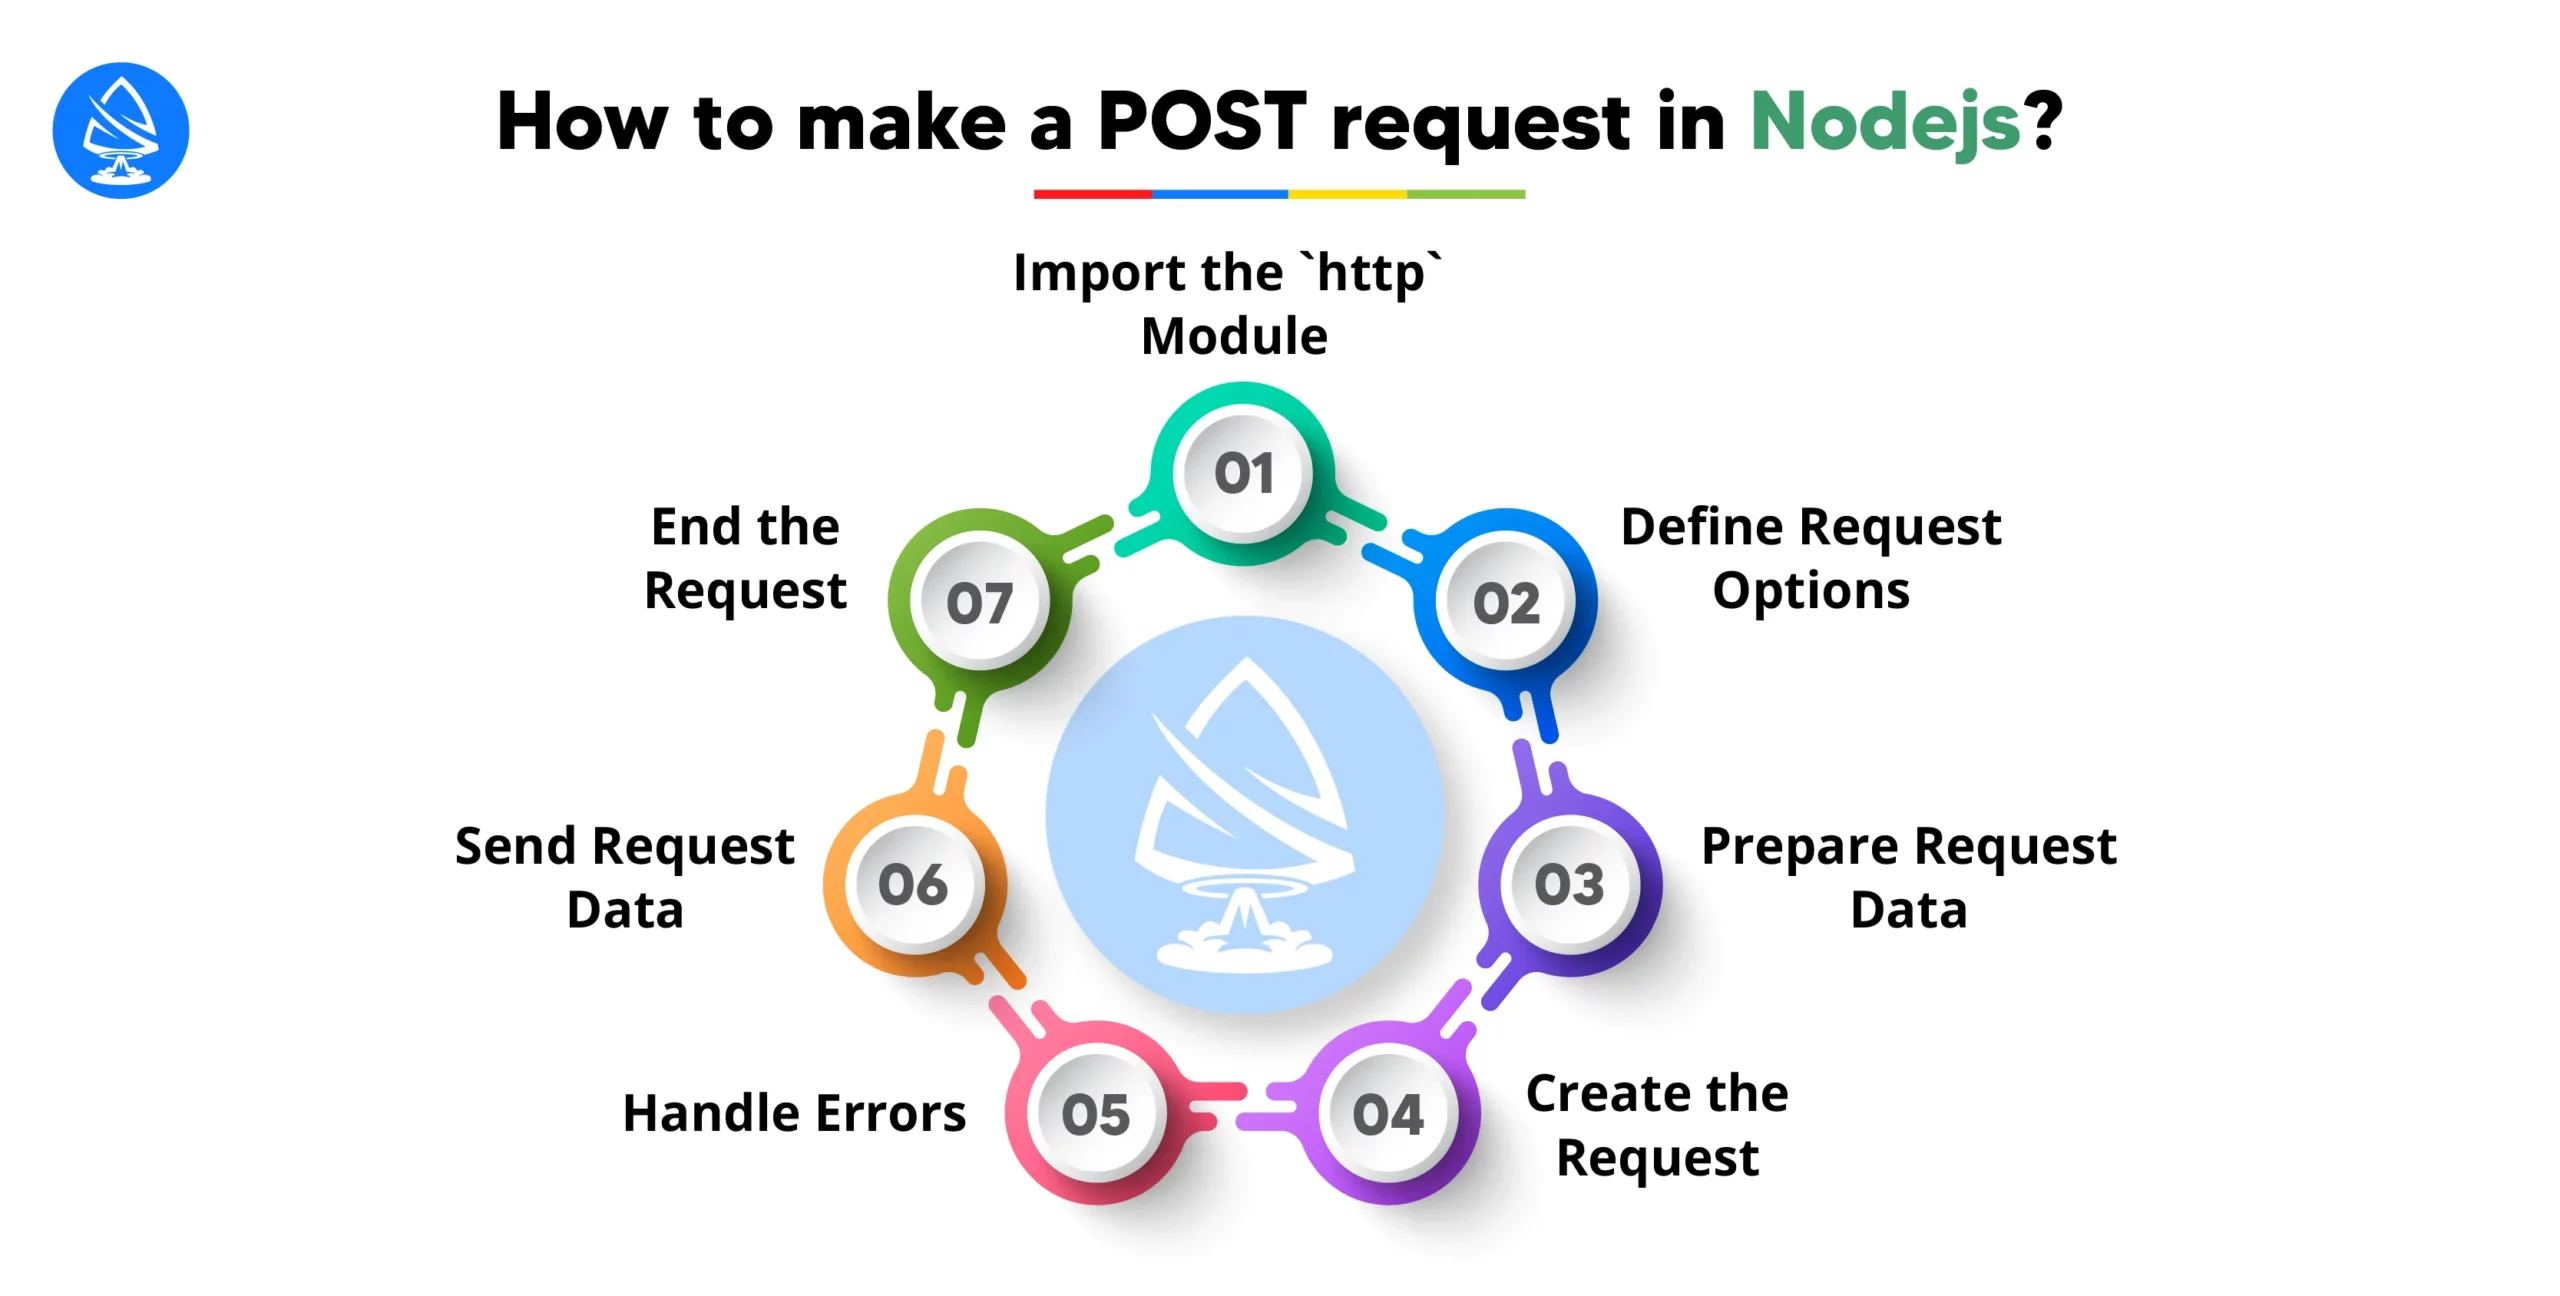
Making a Node.js POST request involves several steps, including setting up the request options, handling the request data, and processing the response. Below is a detailed explanation of how to make a Node.js POST request using the built-in `http` module:
Begin by importing the `http` module, which is a built-in module in Node.js, to work with HTTP requests and responses.
| const http = require(‘http’); |
Set up the options object that contains information about the request, such as the target URL, request method (in this case, POST), headers, and any other relevant data.
| const options = { hostname: ‘api.example.com’, port: 80, path: ‘/endpoint’, method: ‘POST’, headers: { ‘Content-Type’: ‘application/json’, ‘Content-Length’: postData.length // Set content length for POST data } }; |
If you’re sending data with the POST request (which is common), you need to prepare the data to be sent. This typically involves converting JavaScript objects into a string format (e.g., JSON.stringify) if you’re sending JSON data.
| const postData = JSON.stringify({ key: ‘value’ }); |
Use the `http.request()` method to create the POST request object. Pass the options object you defined earlier and a callback function to handle the response from the server.
| const req = http.request(options, (res) => { let data = ”; res.on(‘data’, (chunk) => { data += chunk; }); res.on(‘end’, () => { console.log(data); // Handle the response data }); }); |
Attach an event listener for the ‘error’ event to handle any errors that might occur during the request.
| req.on(‘error’, (error) => { console.error(error); }); |
If you’re sending data with the request, use the `write()` method of the request object to send the data.
| req.write(postData); |
End the request using the `end()` method to signal that you have finished sending the request data.
| req.end(); Putting it all together, here‘s a complete example of making a POST request in Node.js: const http = require(‘http‘); const postData = JSON.stringify({ key: ‘value‘ }); const options = { hostname: ‘api.example.com‘, port: 80, path: ‘/endpoint‘, method: ‘POST‘, headers: { ‘Content-Type‘: ‘application/json‘, ‘Content-Length‘: postData.length } }; const req = http.request(options, (res) => { let data = ”; res.on(‘data‘, (chunk) => { data += chunk; }); res.on(‘end‘, () => { console.log(data); }); }); req.on(‘error‘, (error) => { console.error(error); }); req.write(postData); req.end(); |
This code sends a POST request to `api.example.com/endpoint` with JSON data and logs the response from the server. Adjust the `hostname`, `port`, `path`, and `postData` variables according to your specific use case.
Handling POST requests in Node.js involves receiving data sent from a client, parsing and processing that data, and then generating an appropriate response. Below is a detailed explanation of how to handle POST requests in Node.js:
Start by creating an HTTP server using the `http` module. This server will listen to incoming HTTP requests and handle them accordingly.
| const http = require(‘http’); const server = http.createServer((req, res) => { // Request handling logic will be implemented here }); const PORT = 3000; server.listen(PORT, () => { console.log(`Server is listening on port ${PORT}`); }); |
Inside the server callback function, implement logic to handle incoming requests. Use the `req` object to access request details and the `res` object to send responses back to the client.
| const server = http.createServer((req, res) => { if (req.method === ‘POST’ && req.url === ‘/endpoint’) { let body = ”; req.on(‘data’, (chunk) => { body += chunk.toString(); }); req.on(‘end’, () => { console.log(‘Received POST data:’, body); // Process the received data // Send a response back to the client res.end(‘Received your POST request’); }); } else { // Handle other types of requests or routes . res.statusCode = 404; res.end(‘Not Found’); } }); |
When handling a POST request, listen for the `data` event on the `req` object to collect the incoming data stream. As data arrives, concatenate it into a string. When all data has been received (signaled by the `end` event), parse the collected data if necessary and process it accordingly.
After processing the POST data, send an appropriate response back to the client using the `res.end()` method. This method closes the response stream and sends the specified data back to the client.
| res.end(‘Received your POST request’); |
It’s important to handle errors that may occur during the request handling process. Attach an error event listener to the request object (`req`) to catch and handle any errors gracefully.
| req.on(‘error’, (error) => { console.error(‘Error:’, error); res.statusCode = 500; res.end(‘Internal Server Error’); }); |
Optionally, set any required response headers before sending the response to the client using the `res.writeHead()` method.
| res.writeHead(200, { ‘Content-Type’: ‘text/plain’ }); |
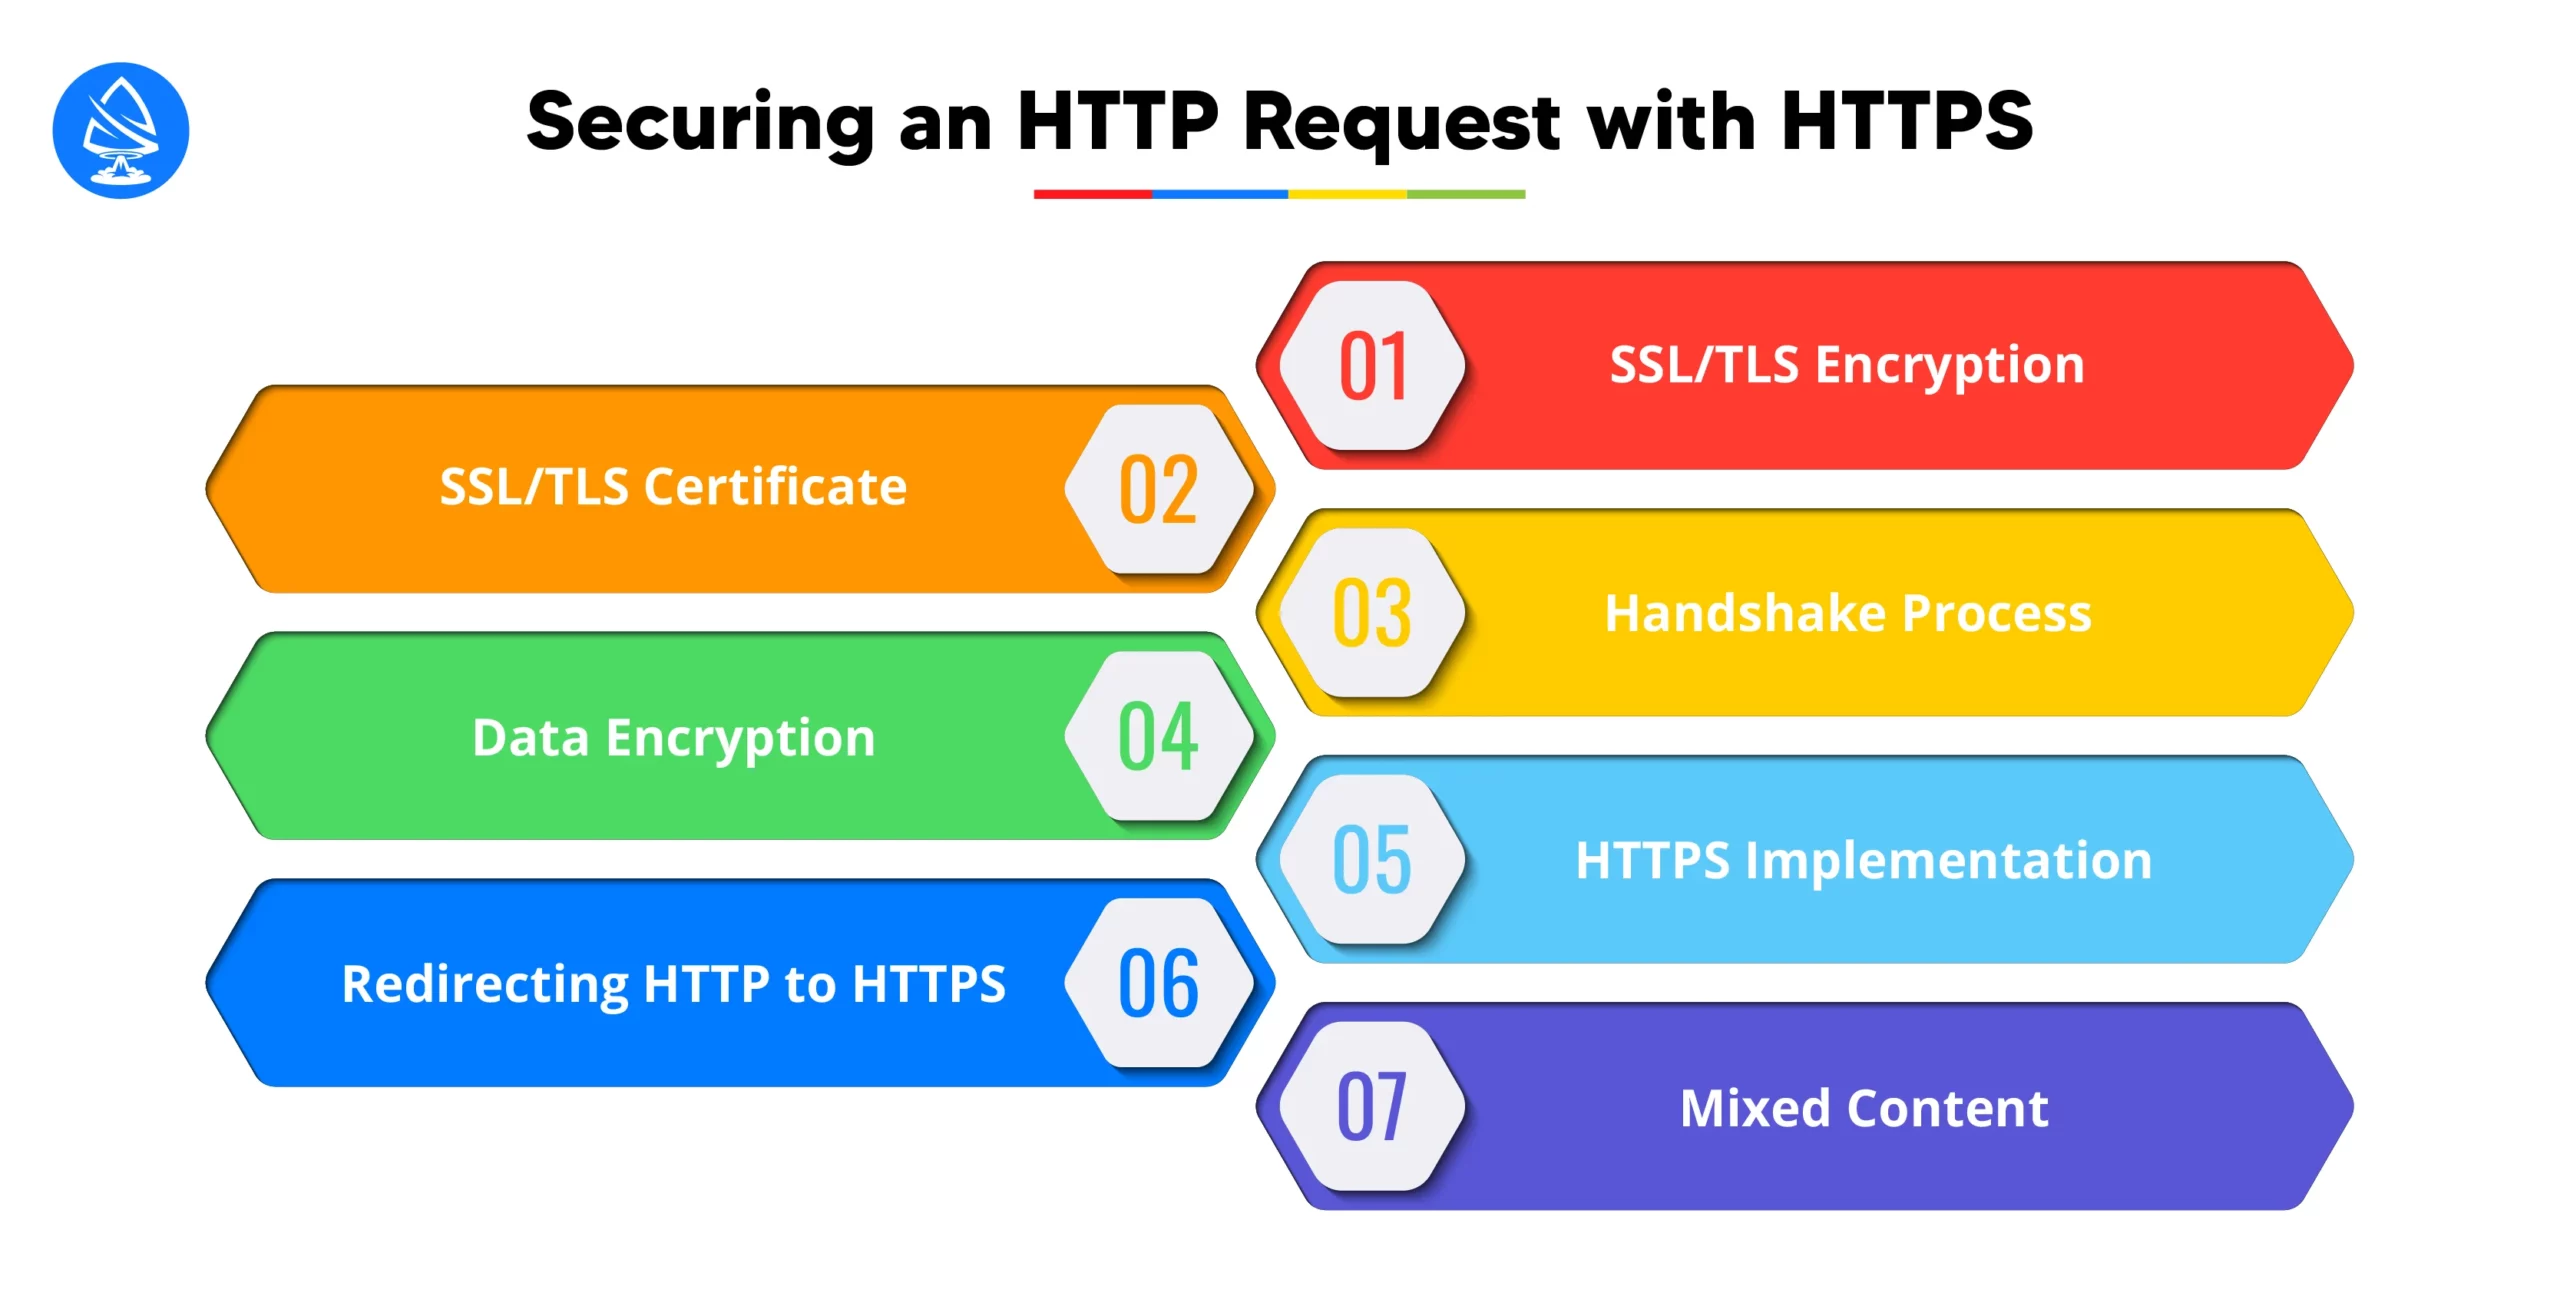
Securing HTTP requests with HTTPS (Hypertext Transfer Protocol Secure) is crucial for protecting data transmitted over the internet from interception, tampering, and eavesdropping. HTTPS encrypts the data exchanged between a client (such as a web browser) and a server, ensuring confidentiality and integrity. Here’s a detailed explanation of how HTTPS works and how to implement it:
HTTPS relies on SSL/TLS (Secure Sockets Layer/Transport Layer Security) encryption to establish a secure connection between the client and server. SSL/TLS uses cryptographic protocols to encrypt data transmitted over the network, making it unreadable to anyone who intercepts it.
To enable HTTPS, a server must have an SSL/TLS certificate installed. This certificate contains cryptographic keys and identifies the server to clients. It is issued by a trusted Certificate Authority (CA) and contains information such as the server’s domain name, organization details, and the public key used for encryption.
When a client connects to a server over HTTPS, they initiate a handshake process to establish a secure connection. During this process, the client and server exchange information, including supported encryption algorithms and cryptographic keys. They also verify each other’s identities using the SSL/TLS certificate.
Once the handshake is complete and the secure connection is established, data exchanged between the client and server is encrypted using symmetric encryption algorithms. This means that even if intercepted, the data is unreadable without the appropriate decryption key.
To implement HTTPS in a web application, you need to configure the web server to support SSL/TLS encryption and install an SSL/TLS certificate. Most web servers, such as Apache and Nginx, provide built-in support for HTTPS and offer tools for generating and installing SSL/TLS certificates.
To ensure that all traffic is encrypted, it’s essential to redirect HTTP requests to HTTPS. This can be done using server-side configuration or by adding redirection rules to the application’s code.
When serving content over HTTPS, it’s important to ensure that all resources (e.g., images, scripts, stylesheets) are also served securely. Mixing HTTPS and HTTP content (mixed content) can compromise the security of the connection and trigger browser warnings.
Read More: How to Install Node and NPM
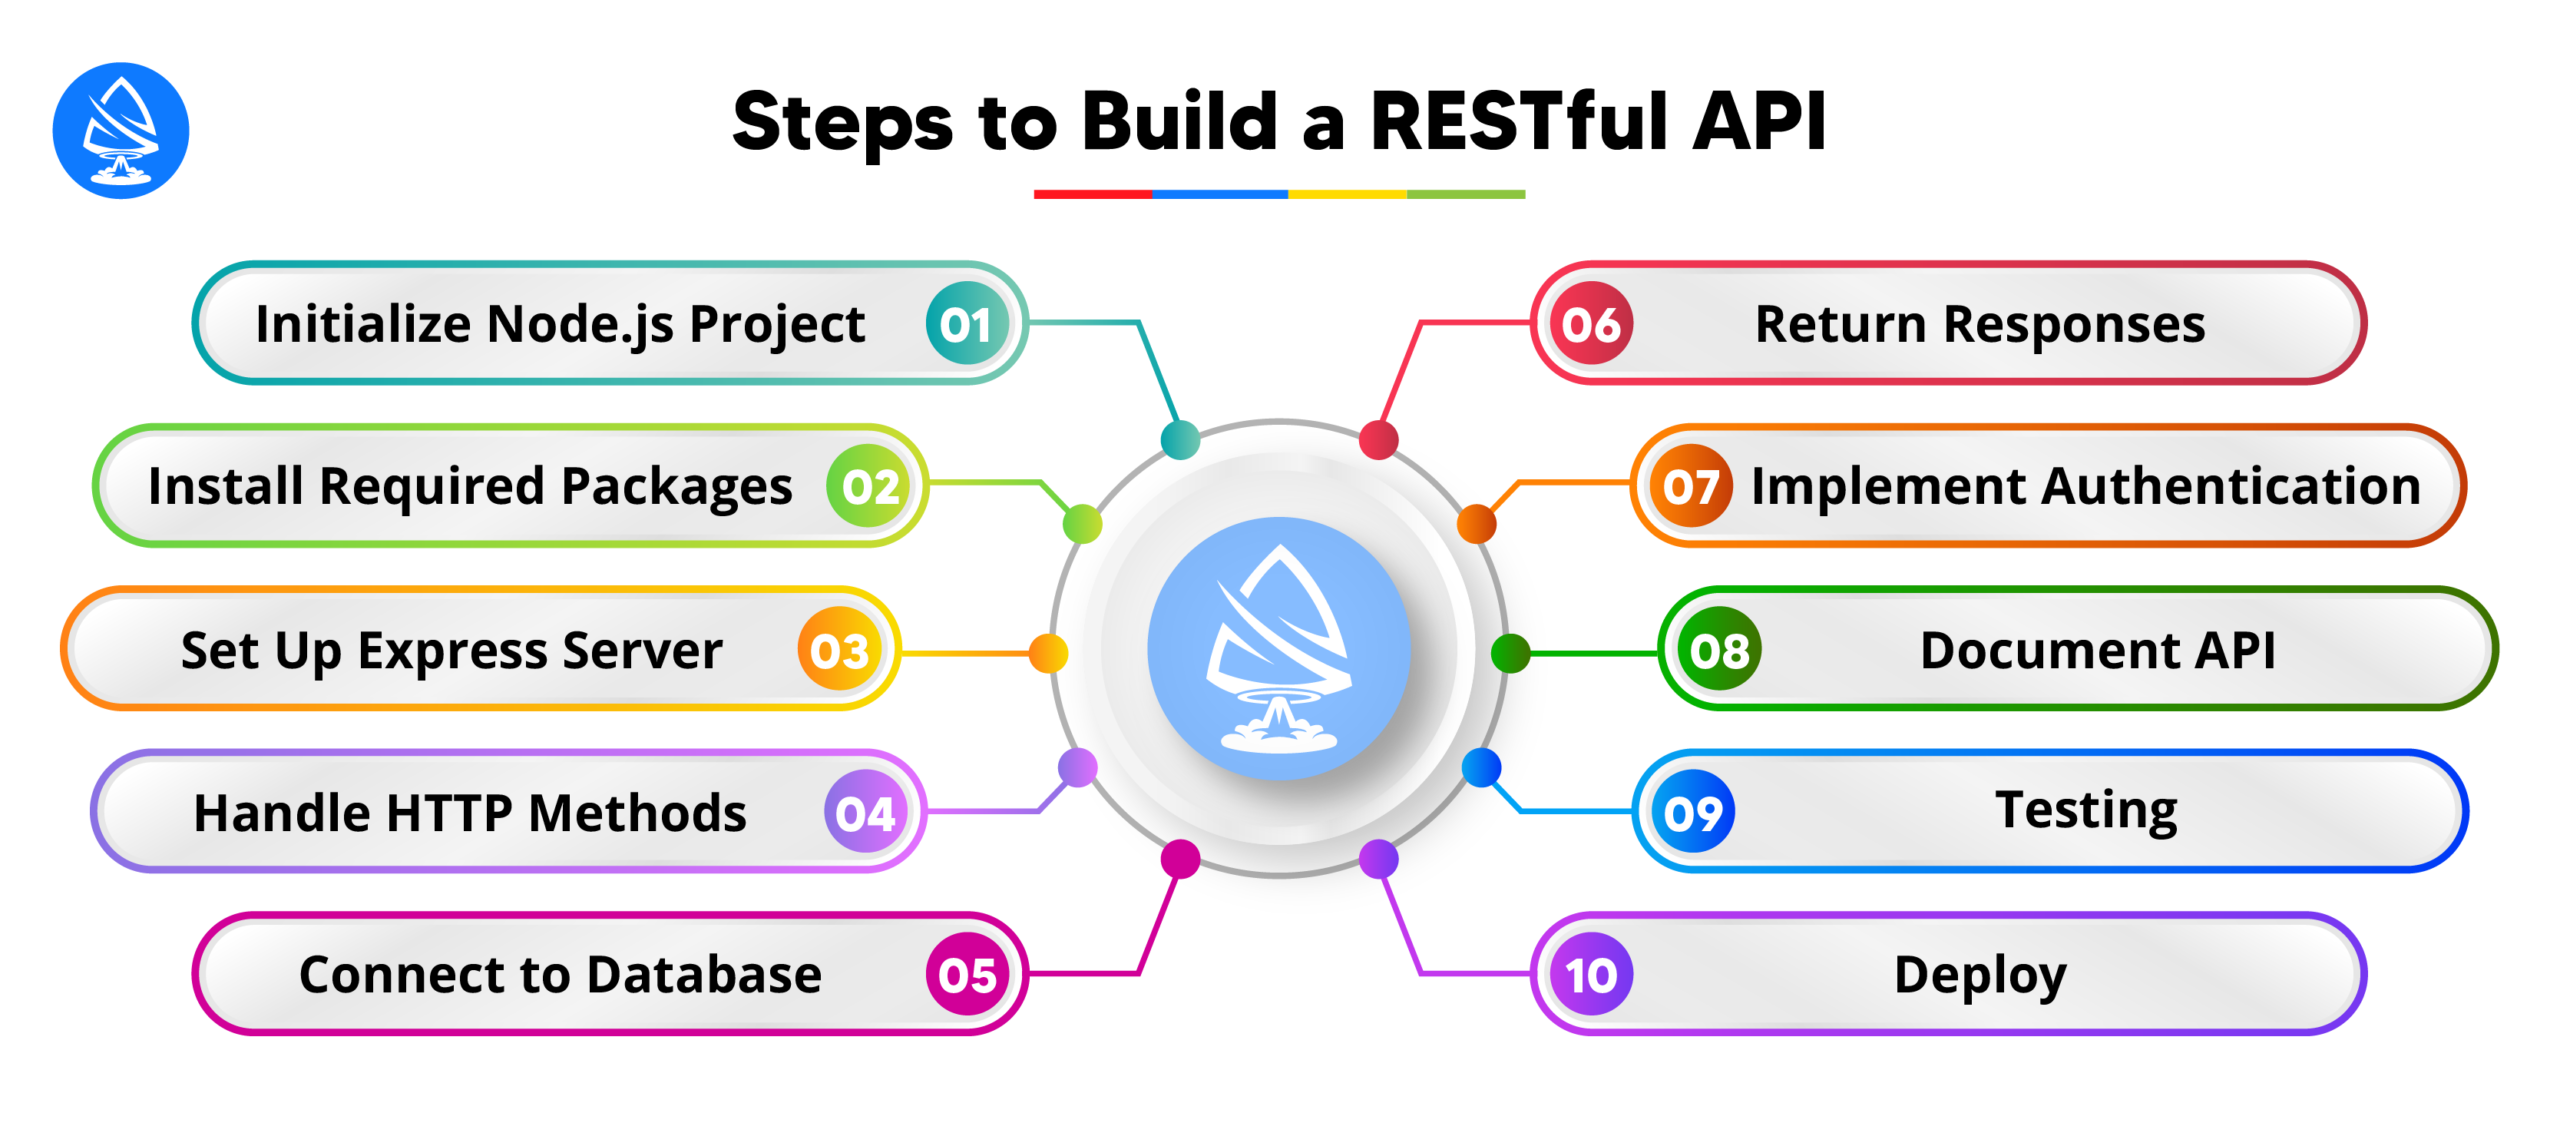
Building a RESTful API with Node.js involves creating a server that adheres to the principles of Representational State Transfer (REST), allowing clients to interact with resources using standard HTTP methods such as GET, POST, PUT, DELETE, etc. Here’s a detailed explanation of how to build a RESTful API with Node.js:
Begin by creating a new Node.js project and initializing it with a package.json file. You can use npm or yarn to manage dependencies and scripts.
Install necessary packages such as Express.js, a popular web framework for Node.js, which simplifies building web applications and APIs.
| npm install express |
Create an Express server to handle HTTP requests. Define routes for different API endpoints, and specify the actions to be taken when those endpoints are accessed.
| const express = require(‘express’); const app = express(); const PORT = process.env.PORT || 3000; // Define routes app.get(‘/api/users’, (req, res) => { // Logic to fetch a list of users from the database res.json(users); }); app.post(‘/api/users’, (req, res) => { // Logic to create a new user }); app.put(‘/api/users/:id’, (req, res) => { // Logic to update an existing user }); app.delete(‘/api/users/:id’, (req, res) => { // Logic to delete a user }); // Start the server app.listen(PORT, () => { console.log(`Server is running on port ${PORT}`); }); |
Define appropriate logic for handling different HTTP methods (GET, POST, PUT, DELETE) on various endpoints. Use Express middleware to parse request bodies, validate input data, authenticate users, etc.
If your API requires data persistence, connect it to a database (e.g., MongoDB, PostgreSQL, MySQL) using a database client library such as Mongoose or Sequelize. Implement database queries and operations within route handlers to fetch API, create, update, or delete data.
Ensure that your API returns appropriate responses to client requests. Use HTTP status codes to indicate the outcome of each request (e.g., 200 for success, 400 for bad request, 404 for not found, 500 for server error). Return data in a consistent format (e.g., JSON) along with relevant metadata.
If your API requires access control, implement authentication and authorization mechanisms. Use middleware to authenticate users, verify access tokens, and enforce authorization rules based on user roles and permissions.
Document your API to provide developers with information on how to use it. Use tools like Swagger or OpenAPI Specification to generate API documentation automatically from your code.
Write tests to ensure the reliability and functionality of your API. Use testing frameworks like Mocha, Chai, or Jest to write unit tests, integration tests, and end-to-end tests for your API endpoints.
Deploy your API to a hosting platform (e.g., Heroku, AWS, Azure) to make it accessible to clients over the internet. Configure environment variables, set up logging, and monitor performance to ensure smooth operation in production.
Read More: 10 Best Free Node.js Hosting Providers in 2024
Integrating Node.js with external APIs involves making HTTP requests to external services, receiving responses, and processing data returned by those services. Here’s a step-by-step guide on how to integrate Node.js with external APIs:
Decide which external API you want to integrate with your Node.js application. Common examples include social media APIs (e.g., Twitter, Facebook), payment gateways (e.g., PayPal, Stripe), weather APIs, and third-party data providers.
Choose an HTTP client library for Node.js to make HTTP requests to the external API. Popular choices include `axios`, `node-fetch`, `request`, and `got`. Install the desired HTTP client library using npm or yarn.
| npm install axios |
Import the HTTP client library into your Node.js application.
| const axios = require(‘axios’); |
Use the HTTP client to make requests to the external API endpoints. Depending on the API’s requirements, you may need to provide query parameters, headers, authentication tokens, or request bodies.
| axios.get(‘https://api.example.com/data’) .then(response => { console.log(response.data); }) .catch(error => { console.error(error); }); |
Handle the responses returned by the external API. Extract relevant data from the response object and process it as needed in your application with the “x www form urlencoded” method.
Implement error handling to handle cases where the external API returns an error response or the request fails due to network issues or other reasons. Use `try-catch` blocks or `.catch()` method to handle errors returned by the HTTP client.
Since HTTP requests are asynchronous status code, a user can handle them using asynchronous JavaScript techniques such as Promises, async/await, or callback functions. This ensures that your application remains responsive and can handle multiple concurrent requests efficiently.
| async function fetchData() { try { const response = await axios.get(‘https://api.example.com/data’); console.log(response.data); } catch (error) { console.error(error); } } fetchData(); |
Integrate the data obtained from the external API with your application’s logic. Process the data, perform calculations, update the database, or display it to users as required by your application’s functionality.
Test your integration thoroughly to ensure that it behaves as expected under different conditions. Validate the data returned by the external API to ensure it meets your application’s requirements and expectations.
Monitor the performance of your integration to identify any bottlenecks, latency issues, or errors. Use logging and monitoring tools to track HTTP requests, response times, and error rates.
“How to Install Nodejs Debian in your system? | A Detailed Guide”

When working with HTTP POST requests in Node.js, you may encounter several common errors. Here are some of them, along with troubleshooting tips:
Understanding HTTP POST requests, NodeJS is essential for building dynamic web applications that interact with servers efficiently. By mastering the concepts of HTTP requests, Nodejs HTTPS POST requests, implementing secure HTTPS connections, and following best practices, developers can elevate their Node.js development skills and create high-performance applications.
Node.js has gained popularity in the development community for its scalability, speed, and versatility. Businesses looking to leverage the power of Node.js can benefit from professional development services that offer expertise in building robust and scalable applications. If you are also looking forward to expanding your growth, select Artoon Solutions as your Nodejs development company. Our 14+ years of experience in Nodejs development services showcase our expertise in the field.
Contact Us and Hire Nodejs Developers Now!
The main difference between const https, HTTP GET and POST requests lies in how data is sent to the server. GET requests send data through the URL parameters, visible to users, while POST requests send data in the request body, keeping it hidden from view. GET requests are typically used for retrieving data, while POST requests are used for sending data to the server for processing.
To handle file uploads in Node.js using HTTP POST requests, developers can utilize packages like `multer` or `formidable` to parse incoming HTML form data and handle file uploads. By configuring middleware to process file uploads, developers can easily handle and store uploaded files on the server.
While using Nodejs HTTPS POST for securing all HTTP requests in Node.js applications is recommended, it may not always be necessary, especially for internal or development environments. However, for production applications handling sensitive data, implementing HTTPS ensures data security and integrity during communication between clients and servers.
Node.js offers several advantages for building RESTful APIs, including its lightweight and event-driven architecture, which allows for handling a large number of concurrent requests efficiently. Node.js also provides a vast ecosystem of modules and libraries, making it easy to integrate with external services and databases, simplifying API development and maintenance.
To optimize the performance of HTTP POST requests in Node.js applications, developers can implement best practices such as using asynchronous operations, caching data where possible, minimizing database queries, and optimizing code for efficiency. Additionally, utilizing clustering and load-balancing techniques can help distribute incoming requests and improve overall performance.
Artoon Solutions
Artoon Solutions is a technology company that specializes in providing a wide range of IT services, including web and mobile app development, game development, and web application development. They offer custom software solutions to clients across various industries and are known for their expertise in technologies such as React.js, Angular, Node.js, and others. The company focuses on delivering high-quality, innovative solutions tailored to meet the specific needs of their clients.