- HR:+91-879-9184-787
- Sales:+91-908-163-7774

Are you planning to create a game in Unity? If so, you must go through this article which describes factors you need to consider to meet Unity 3D minimum requirements. Unity 3D is a popular cross-platform game engine that is widely used by game developers around the world to create stunning games for various platforms. Whether you’re a novice or a seasoned developer, Unity 3D’s intuitive interface and powerful suite of tools make it the go-to choice for bringing your creative visions to fruition. Install Unity Engine to unlock a world of game development possibilities and unleash your creativity.
In this article, we will explore the essential aspects of Unity 3D minimum requirements, and guide you through the installation process. If you are trying to enhance your existing skills, this guide will serve as your compass in Unity 3D game development.
Before you install Unity 3D on your system, it’s essential to understand the minimum requirements needed to ensure optimal performance. These requirements typically include specifications such as CPU, GPU, RAM, and storage space. By meeting these requirements, you can avoid performance issues and enjoy a seamless game development experience.
Unity 3D requirements for Windows, MacOS, and Linux are as follows:
Operating System: Unity supports various versions of Windows, including Windows 7 SP1 or newer, Windows 8, and Windows 10. It’s recommended to use a relatively recent version of Windows to ensure compatibility with the latest features and optimizations. Make sure you have Unity3D Game Engine download in your system.
CPU (Central Processing Unit): A quad-core Intel or AMD processor with a clock speed of 2.5 GHz or higher is recommended for optimal performance. Unity’s development environment and runtime benefit from multiple CPU cores, allowing for smoother performance during tasks such as rendering and physics calculations.
Graphics API: Unity on Windows primarily utilizes DirectX 11 as the default graphics API for rendering graphics and interacting with the GPU (Graphics Processing Unit). DirectX 11 provides advanced rendering capabilities and efficient resource management for creating visually stunning games.
Additional Requirements: Unity requires the .NET framework, typically equivalent to .NET 4.6 or later, to run on Windows. Additionally, Shader Model 4.0 or higher is necessary for rendering advanced graphics effects and shaders in Unity projects.
Operating System: Unity supports MacOS 10.12 (Sierra) or newer. MacOS provides a stable and efficient platform for game development with Unity, offering compatibility with the latest features and optimizations. Make sure you have Unity download for Mac.
CPU: A dual-core Intel CPU with a clock speed of 2.5 GHz or higher is recommended for running Unity smoothly on MacOS. Similar to Windows, multiple CPU cores contribute to better performance during tasks such as rendering and physics simulations.
Graphics API: MacOS supports multiple graphics APIs, including Metal, OpenGL, and Vulkan. Metal is Apple’s proprietary graphics API designed for high-performance rendering on MacOS and iOS devices. Unity developers can also utilize OpenGL or Vulkan depending on their project’s requirements.
Additional Requirements: Unity on MacOS requires the .NET framework equivalent, similar to Windows. Additionally, Shader Model 4.0 or higher is needed for rendering advanced graphics effects and shaders.
Operating System: Unity supports various Linux distributions, including Ubuntu 16.04, CentOS 7, and other similar distributions. Linux provides an open-source platform for game development with Unity, offering flexibility and customization options.
CPU: Similar to Windows and MacOS, a quad-core Intel or AMD processor with a clock speed of 2.5 GHz or higher is recommended for running Unity smoothly on Linux.
Graphics API: Unity on Linux primarily utilizes OpenGL or Vulkan as the graphics API for rendering graphics and interacting with the GPU. OpenGL is a widely supported open-source graphics API, while Vulkan offers high-performance graphics rendering and efficient multithreading capabilities.
Additional Requirements: Unity on Linux requires the .NET framework equivalent for compatibility. Similarly, Shader Model 4.0 or higher is necessary for rendering advanced graphics effects and shaders in Unity projects.
This table summarizes the Unity 3D Requirements.
| Minimum Requirements | Windows | MacOS | Linux |
| OS Version | Windows 7 (SP1+), Windows 8, Windows 10, and Windows 11 (64-bit versions only) | Mojave 10.14+ (Intel Editor)
Big Sur 11.0 (Apple Silicon Editor) |
Ubuntu 20.04 and Ubuntu 18.04. |
| CPU | X64 architecture with SSE2 instruction set support | X64 architecture with SSE2 instruction set support (Intel processors)
Apple M1 or above (Apple silicon-based processors) |
X64 architecture with SSE2 instruction set support |
| Graphics API | DX10, DX11, and DX12-capable GPUs (NVIDIA or AMD) | Metal-capable Intel and AMD GPUs | OpenGL 3.2+ or Vulkan-capable, Nvidia and AMD GPUs. |
| Additional Requirements | Hardware vendors officially supported drivers. Shader Model 4.0 | Apple officially supported drivers (Intel processor)
Rosetta 2 is required for Apple silicon devices running on either Apple silicon or Intel versions of the Unity Editor. |
Gnome desktop environment running on top of X11 windowing system, Nvidia official proprietary graphics driver, or AMD Mesa graphics driver. Other configuration and user environments have provided stock with the supported distribution (Kernel, Compositor, etc.) |
Unity 3D minimum requirements for the software part are as follows:
Unity Editor: The core component of Unity 3D, the Unity Editor, is the integrated development environment (IDE) where developers create, modify, and manage Unity projects. To use Unity Editors, you need to download and install the appropriate version from the Unity website. Unity offers different editions, including Personal, Plus, and Pro, with varying features and pricing.
Operating System Compatibility: Unity Editor is compatible with multiple operating systems, including Windows, macOS, and Linux. Ensure that you have a compatible version of the operating system installed on your computer before installing Unity Editors.
.NET Framework (Windows): On Windows, Unity requires the .NET framework for various functionalities. The recommended version is typically equivalent to .NET 4.6 or later. This framework provides a set of libraries and runtime components necessary for running Unity applications on Windows.
Xcode (macOS): Firstly have your Unity download for Mac. After that, having Xcode installed is beneficial, especially if you plan to build and deploy Unity projects for iOS devices. Xcode provides essential tools, such as compilers and simulators, for iOS app development and deployment.
iOS and Android SDKs: If you intend to develop and deploy Unity projects for mobile platforms such as iOS and Android, you’ll need to install the respective SDKs (Software Development Kits). These SDKs provide essential tools, libraries, and resources for building and testing mobile applications.
Shader Development Tools: If you plan to create custom shaders for your Unity projects, you may need additional tools for shader development. Unity provides Shader Graph, a visual node-based tool for creating shaders, or you can use external shader editors such as ShaderForge or Amplify Shader Editor.
Read More : Unity Programming Languages: Your Top Choices for 2024
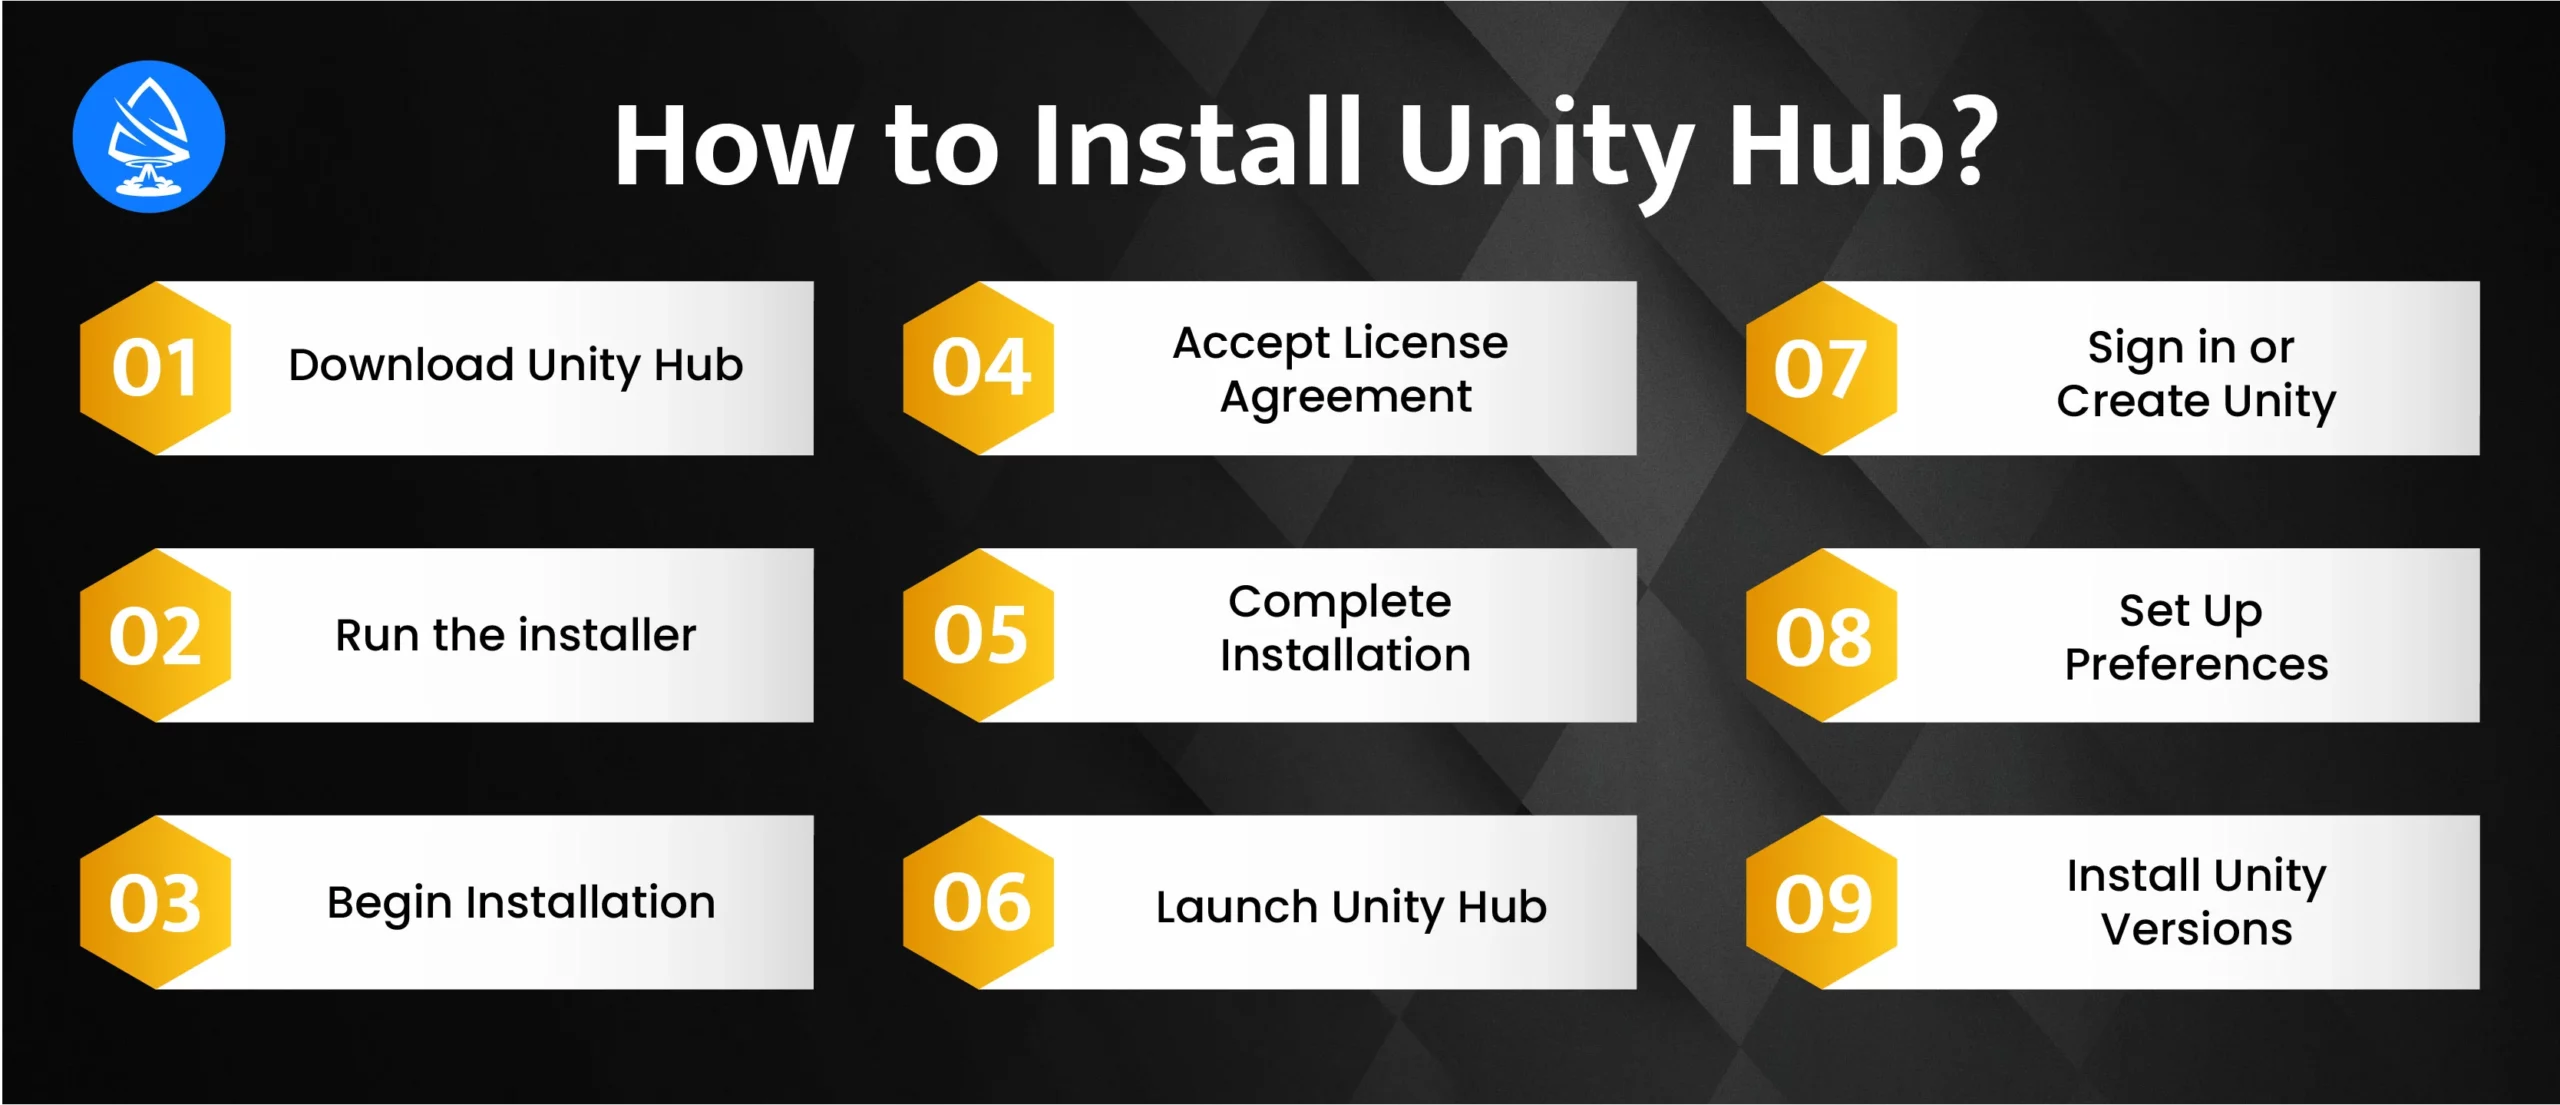
Installing Unity Hub is a process that allows you to manage your Unity installations and projects efficiently. Unity3D Game Engine download beforehand to access Unity Hub. Here’s a detailed step-by-step guide on how to install Unity Hub:
After installing Unity Hub, you can easily install Unity Editor through the Unity Hub interface. Here’s how you can do it:
Launch Unity Hub by double-clicking on its icon or locating it in your system’s applications.
If you haven’t already signed in with your Unity ID, you may be prompted to do so when you open Unity Hub. Enter your credentials or create a new Unity ID if you don’t have one.
In the Unity Hub interface, click on the “Installs” tab located on the left side of the window. This tab allows you to manage your Unity Editor installations.
To install Unity Editors, click on the “Add” button located in the upper-right corner of the Unity Hub window. This action will open a window displaying a list of available Unity 3D latest version.
Browse through the list of available Unity versions and select the version you want to install. You can use the search bar or filters to narrow down the list based on your preferences.
Once you’ve selected a Unity version, you may have the option to choose additional modules to install alongside the Unity Editor. These modules include specific platform support (e.g., iOS, Android) and additional features like WebGL support or Visual Studio integration.
Unity Hub will prompt you to choose the installation location for the selected Unity version. You can either accept the default location or specify a custom directory according to your preferences.
After selecting the Unity version and any desired modules, click on the “Next” or “Done” button to initiate the installation process. Unity Hub will download the necessary files and install the selected Unity Editor version on your system.
Unity Hub will display the progress of the installation, including download speed, remaining time, and status updates. Depending on your internet connection speed and the size of the selected Unity 3D latest version, the installation process may take some time to complete.
Once the installation is finished, you can launch Unity Editor by returning to the “Projects” tab in Unity Hub and clicking on the “New” button to create a new project, or by selecting an existing project from the list and clicking on the “Open” button to launch it with the newly installed Unity Editor. For the latest Unity Editor download, explore the official Unity website to access the tools you need for your game development journey.
Troubleshooting common installation issues with Unity Hub or Unity Editor may require some basic troubleshooting steps. Here are some common issues and steps to resolve them:
Problem: Unity Hub fails to install or encounters errors during installation.
Solution:
Problem: Unity Editor fails to install or encounters errors during installation.
Solution:
Problem: Unity Hub does not detect Unity Editor installations even after they’ve been installed.
Solution:
Problem: Unity Hub downloads or updates Unity Editor at a slow speed.
Solution:
Problem: Error messages appear during the installation process, preventing Unity Hub or Unity Editor from being installed successfully.
Solution:
Unity 3D offers a wide range of benefits for game developers, including a robust game engine, flexible development environment, and extensive asset store. With Unity 3D, you can create high-quality games for various platforms, including mobile, PC, and consoles. Explore the full potential of Unity 3D to unleash your creativity and build engaging games.
Whether you are a solo indie developer or part of a game development team, Unity 3D provides the tools and resources you need to bring your game ideas to life. From 2D platformers to immersive 3D worlds, Unity 3D supports a wide range of game genres and styles.
The Unity Asset Store is a treasure trove of resources for Unity game developers as it offers a wide range of assets, scripts, and tools to enhance your game projects. Explore the asset store to find 3D models, textures, animations, and more to speed up your development process and add polish to your games. The Unity Asset Store is a valuable resource for developers of all skill levels.
Unity 3D has a vibrant community of developers, artists, and enthusiasts who are passionate about game development. Join the Unity forums, attend local meetups, and engage with the community to learn from others, share your knowledge, and collaborate on exciting projects. The Unity community is a valuable resource for support, inspiration, and networking opportunities.
To meet the minimum requirements for Unity 3D is essential to ensure a smooth and seamless game development experience. By understanding the system specifications, following the installation process, and staying up-to-date with the latest version of Unity 3D, you can build game apps for various platforms. You can free download Unity 3D for your gaming projects.
So, are you in search of a game development company? Or are you planning to build a gaming application for your business? If so, then you are at the right place. Artoon Solutions is a reputed Unity 3D Game development company globally and has worked with gaming giants such as MPL, A23, Flipkart, Junglee Games, Zupee, Team 18 Play, 3 Plus Games and many more. Take your gaming innovation to the next level with Artoon Solutions.

Yes, Unity 3D is compatible with Mac systems, and you can install it on your Mac by following the specific instructions provided for Mac users. The installation process for Unity 3D on a Mac may vary slightly from the Windows version, but it is user-friendly and straightforward.
The minimum requirements for running Unity 3D smoothly typically include specifications such as CPU, GPU, RAM, and storage space. By meeting these requirements, you can ensure optimal performance and stability while using the Unity game engine.
If you encounter installation issues with Unity 3D, you can refer to the official Unity documentation for troubleshooting tips and solutions to common problems. Additionally, you can seek help from the Unity community forums where experienced developers can provide assistance and guidance.
Unity 3D offers both free and paid versions, allowing developers to choose the option that best suits their needs. The free version of Unity 3D provides access to essential features and tools for game development, making it ideal for beginners and indie developers.
To stay updated with the latest version of Unity 3D, you can regularly check the official Unity website for announcements and release notes. Unity 3D also offers notifications within the Unity Editor when new updates are available, allowing you to easily update your installation to the latest version.
Unity 3D can technically run on a system with 4GB of RAM, but it may struggle with larger projects or resource-intensive tasks, and performance may be suboptimal. For a smoother experience, it’s generally recommended to have at least 8GB or more of RAM for Unity development.
Yes, you can run Unity 3D without a dedicated graphics card, but the performance may be limited, especially when working with complex scenes or graphics-intensive tasks. Unity utilizes the CPU for rendering in such cases, which may result in slower performance compared to systems with dedicated graphics processing units (GPUs).
Unity’s minimum RAM requirement is 4GB, but for optimal performance, especially when working on larger projects or handling resource-intensive tasks, it’s recommended to have at least 8GB of RAM. More RAM may be beneficial for handling complex scenes, simulations, and multitasking while using Unity.
Artoon Solutions
Artoon Solutions is a technology company that specializes in providing a wide range of IT services, including web and mobile app development, game development, and web application development. They offer custom software solutions to clients across various industries and are known for their expertise in technologies such as React.js, Angular, Node.js, and others. The company focuses on delivering high-quality, innovative solutions tailored to meet the specific needs of their clients.